Service Level Limits and How to Manage
Formsite accounts range from Free to Pro to Enterprise, and each service level has limits. For example, the Free service level allows for 5 forms, 10 results per form, and 50MB file space. The service level limits increase as the services increase to allow higher services more space.
Explaining Service Level Limits
There are basic limits and feature limits, such as access to the Files & Images page, access to send email Notifications, Scheduled Exports, Workflow, etc. The basic limits that apply to all service levels include:
- Number of forms
- Items per form
- Results per form
- File space

These service level limits apply to all service levels and managing these limits is essential for every account owner.
Number of forms
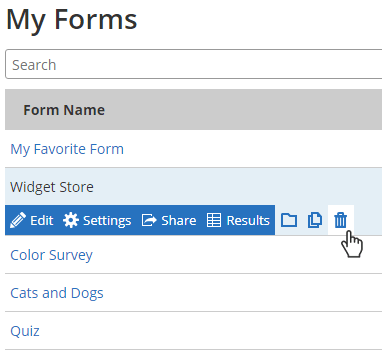
 The forms are listed on the My Forms page and the number of forms is what you see. There is no way to archive or disable forms; if they appear in this list then they’re counted.
When the account reaches its form limit, new forms are not able to be created. The options are to either upgrade to a service level with a higher limit or to delete forms to make room for more.
Click the delete icon on the form to send it to the trash, where it remains for 7 days in case of accidental deletion. The deleted forms can be seen by clicking the folder dropdown at the top-right of the My Forms list then selecting the Deleted folder. Forms that appear in the Deleted folder are able to be restored by clicking the icon. If a form does not appear in the list then it is not able to be restored.
Results and files for the form are also deleted when the form is ultimately deleted, which means they are restored with the form if they weren’t deleted separately.
Items per form
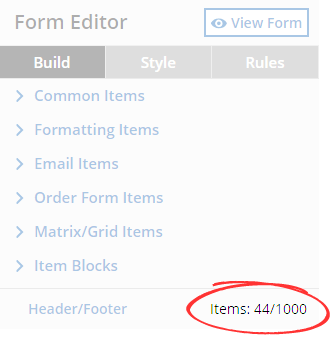
 Each item on the form counts toward the Items per form limit. The numbers displayed under the tools in the form editor shows the total number present in the form and the limit.
The number of items per form represents the optimal number of items to provide the best balance of size and performance. Higher numbers creates longer forms, which can cause problems with user experience, results management, and even system performance in some cases.
Reaching the service level limits while building forms usually requires contacting support for assistance. We review the form for ways to combine and optimize the items, and adjust the limit if necessary.
Results per form
Every new form submission is saved as a result in the form’s Results Table. Each row is counted as 1 result and the Results per form limit refers to the max number of rows allowed in the form’s Results Table.

When the form reaches its results limit, the users receive an error message when they attempt to submit the form. An essential part of form ownership requires monitoring the number of results to remain under the limit.
The limit refers to the maximum number of results allowed in the form’s Results Table at any time. Once the limit is reached, the options are to upgrade to a service level with a higher limit or to delete results to make room for more.
Results are always able to be exported for local safe-keeping with all service levels from the Results -> Export Results page. Results can then be deleted either individually from the Results Table or in bulk from the Results -> Delete Results page.
File space
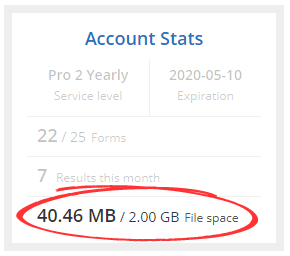
 Files uploaded to the form through a File Upload item are saved in the form’s Results Table. The files in the account’s User menu -> Files & Images page also count toward this limit.
When the form reaches its file space limit, the users receive an error when attempting to submit a form with an attached file. As with the results, the options are to upgrade for a higher limit or to delete some to make room for more.
What to do if the form reaches the File Space limit:
- On the My Forms page, click the ‘more’ arrow in the list header to see the expanded form data
- Refer to the Files column to see which forms are using the most file space
- Go to the form’s Results -> Export Results page, then click the Attachments link
- Export the form’s Attachments for local safe-keeping
- Go to the form’s Results -> Delete Results page
- Click the Only attachments option, then delete the attached files