Results Table Features & Tips for Managing Form Results
Every Formsite form collects results in its Results Table, with each row as a separate result. Navigating the Results Table is easy for new form owners and learning how it works can make it powerful, too.
Sorting, filtering, customizing columns, and viewing individual results are the tip of the iceberg. Form owners can also:
- Send Notifications and resend Secure Links or Workflow Links
- Trigger integrations
- Assign results to Save & Return users
- Use custom status settings
- Lots more!
Results Table Basics
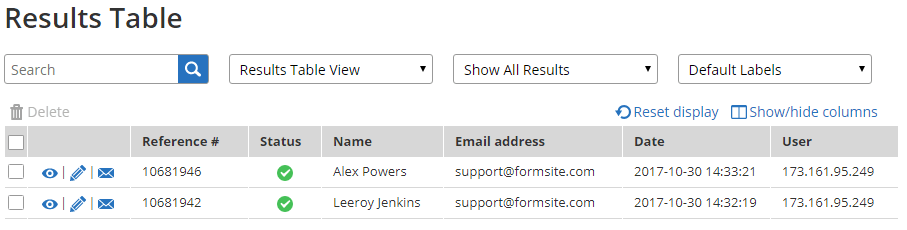
- Every row in the Results Table is a separate result.
- Individual results are viewed, edited, and deleted directly from the Results page.
- Every result has a unique Reference Number that is used to identify the specific result.
- Every result saves the start time, end time, and last-updated time.
- Pro service levels display the IP address and referrer (if available) for every result.
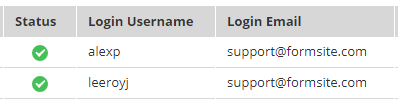 Enabling Save & Return automatically creates a Username and Email Address column. Use the Results Table to assign results to Save & Return users:
- If the user doesn’t have an account, either have the user create an account from the form’s login page or go to Form Settings -> Save & Return to create one for them.
- Return to the Results Table and click on the result’s Username cell, then select the user’s username.
Sorting, Filtering & Viewing
- Clicking the column heading allows for sorting that column (where applicable).
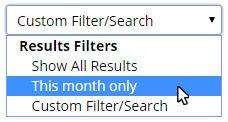 Saved Results Filters can be selected from the dropdown list at the top, or a new filter can be applied instantly to the entire Results Table.
- Use the Show/Hide Columns link to choose which columns to show in the Results Table.
- Change the order of the columns in the Results Table by dragging and dropping them to their desired positions. Click and hold on the column header, then drag to the new position and release the mouse button to drop. Note that this only applies to the online Results Table and does not also modify the order in the exported results.
 The Results Table attempts to retain previous settings and clicking the Reset Display link removes all filters, sorting, etc.
Sending & Resending
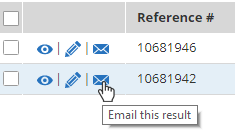 A result’s Notification email can be resent by clicking the envelope icon, then choosing the notification.
- Clicking the envelope icon also allows for sending copies of the notification emails to a custom email address.
- Trigger integrations by clicking the edit icon, then clicking the Update button. If a result shows an error with the integration, the first step is to try manually triggering the integration. If the issue was not a one-time occurrence and the error continues to occur, check the integration settings.
Custom Status
 There are two built-in status columns: The form’s Status column and the Payments column for order forms.
- The form’s Status shows as Incomplete if the required items are not successfully completed, then Complete once they are.
- The order form’s Payments column shows the status of the payment transaction.
- To create a custom status column:
- Go to the form editor
- Add a Dropdown item to the top of the form with the different status settings (New, In process, Complete, Returned, etc.).
- Check the box next to Admin. This setting hides the item from the form but shows it in the Results Table.
- Update the status by logging in, going to the Results page, editing each result, modifying the status, then saving the result.