Create Zoom Meetings & Add Participants with Online Forms

Zoom meetings have become commonplace over the last year as we all find different ways to communicate remotely. Suitable for all people and topics, the ‘zoom meeting’ is quickly becoming the new way to meet. Work meetings, family get-togethers, and classes use video conferencing to reduce physical contact.
Lots of other services exist for virtual meetings, and Zoom’s simple setup and reliability made it the go-to video service. Formsite and Zapier lets form owners create Zoom meetings and add participants with every form submission. Use online forms to schedule Zoom meetings with these easy steps.
Zoom Actions
The available actions for Zoom are as easy as the service:
- Create meeting or webinar
- Add registrant
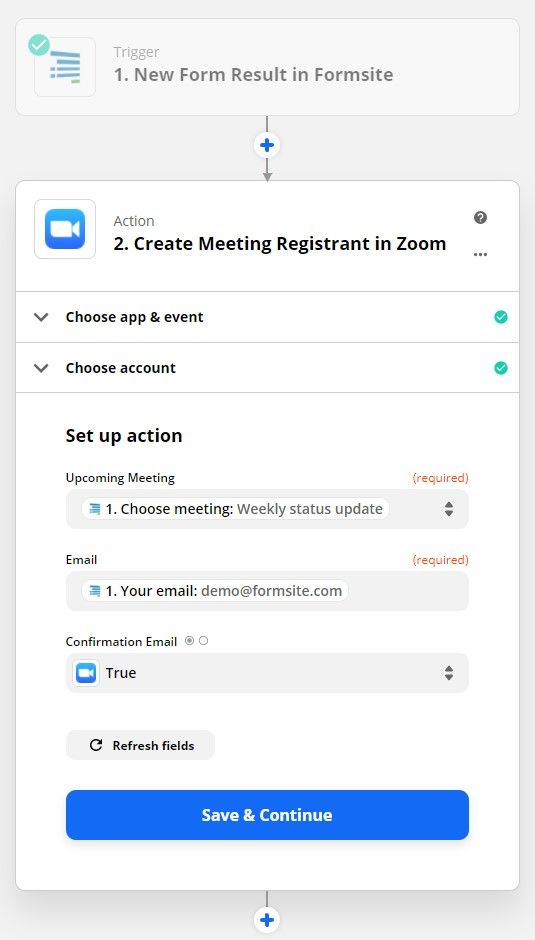
For meetings already scheduled or using a recurring link, the Zap can add registrants. During the Zap setup, the Zoom integration can optionally send a confirmation email.
Start with the Form
As with the other integrations, everything starts with the form. Use the form builder to make the meeting request or scheduling form, then complete a test result. Click the View Form button to see the form and complete a test result with sample data for Zapier.
Create the Zap
Log in to Zapier or make a new account, and click the Make a Zap button.

Trigger (Formsite):
- Choose App & Event: Type Formsite into the search box, then click the Formsite logo
- Trigger Event: New Form Result
- Choose Account: If this is your first time using Zapier with Formsite, you will need to click the ‘add a new account’ link. Select your Formsite account.
- Customize Form Result: Click the dropdown to choose the form that contains your sample data.
- Find Data: Click the Test Trigger button to retrieve the test result from the form.
Action (Zoom):
- Choose App & Event: Type Zoom in the search box and click the logo.
- Action Event: Choose either ‘Create meeting’ or ‘Create registrant’.
- Choose Account: If this is your first time using Zapier with Zoom, you will need to allow Zapier to use your account. Follow the instructions for authorizing the connection.
- Set up Action: Click the dropdowns to set the meeting, email address, and any other data needed. Use the Confirmation Email setting to automatically send the meeting link.
Test Action:
Click the Test and Review button to send the sample form result and confirm that the settings are correct. If all is working as expected, click the button to turn on the Zap.