Piping How-to & Tips for Dynamic Formsite Forms
 Piping is one of the most powerful tools available to form builders, as it allows for viewing and using form answers later in the form. The ability to collect and insert values into messages, other form fields, and file names lets form builders create dynamic systems for personalization and organization.
Formsite’s methods for piping include features that allow form owners to target system data, set default text, and chain together multiple pipe codes to construct complex personalization or naming values.
Basic Piping
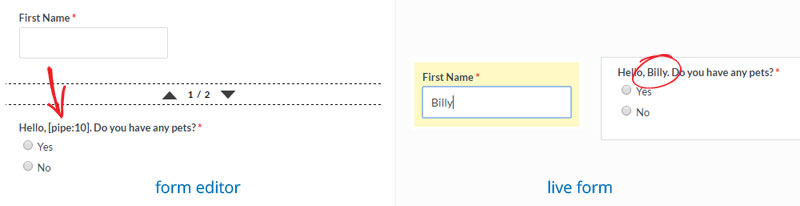
The fundamental use for pipe codes is to send an entered value to another item’s value or label text.
For example:
 Using the system values doesn’t require a source item, as the values are coming from the form itself.
For example, to collect the Save & Return username the pipe code “[pipe:save_return_user]” is used.
Piping can be used in all kinds of places:
- On the form to copy text from one text input item to any form item that supports text, such as another text input item, a Formatted Text item, a Heading item, or a Hidden Field item.
- In Notifications and Success Pages as personalization placeholders or as a confirmation of values entered into the form.
- Used with the Pre-populate link as a way to pre-fill a form with the answers from another form.
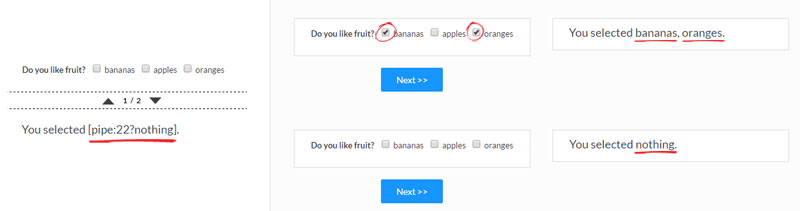
Default Pipe Values
Setting default values is done by inserting a question mark after the item number and inserting your default text after. If no default text is needed, adding the question mark with nothing following will result in a blank entry.
For example:
Advanced Piping
Scenario 1: Create a Quick Order form for repeat customers
This organization has an order form and the form owner wants to make a way for customers to place another order but not have to enter their contact information every time.
The form owner creates an email notification that the customer receives after the first order containing a Quick Order link for the next time. Here’s how:
- After the form has been created, go to the form’s Share page and click the Pre-populate link to see the form with placeholder values.
https://fsx.formsite.com/your_account/your_form/fill?1=1&2=YourValue2&3=YourValue3
- Edit the values in the URL to enter the name of each field in order to identify them later. Delete any pre-populate values that are not needed.
https://fsx.formsite.com/your_account/your_form/fill?2=name&3=company
- Highlight and copy the pre-populate URL.
- Go to the Form Settings -> Notifications page and make a new notification.
- Check the box next to ‘Include message’, then paste the URL and replace the placeholder values with the appropriate pipe codes. The URL will look like this:
https://fsx.formsite.com/your_account/your_form/fill?2=[pipe:2]&3=[pipe:7]
- Highlight the URL and copy the text, then click the link icon in the text editor.
- Paste your link in the URL field and enter the text you want to display as the link in the ‘Text to display’ field.
- Complete the rest of your message, save and test the form.
Tip: The pre-populate link may have trouble if the piped values contain any spaces because URLs require spaces to be either encoded (converted to ‘%20’) or enclosed in quotation marks. This technique works because the URL is enclosed in the link so any spaces do not break the URL. If you find you’re having trouble with automatic link generators, see if that’s the problem.
Scenario 2: Display a Success Page or Notification with a custom message
This form owner has different messages to send based on answers to some of the form items. For example, if the form visitor chooses a morning appointment the form owner wants to send information for morning tasks, while afternoon and evening appointments get different messages.
Instead of making multiple notifications or success pages, the text can be included using pipe codes.
- After the form has been created, the form owner adds Hidden Field items containing the text for each message.
- Each Hidden Field item is edited and rules are set to show the item based on the appointment selection.
- Go to the Form Settings -> Success Pages page and make a new success page or edit an existing one.
- Add the message text, then include pipe codes for each Hidden Field item along with the question mark to indicate a blank default value. For example:
Thank you for setting your appointment on [pipe:3]. Special instructions: [pipe:12?][pipe:13?][pipe:14?]
- Save and test the form.