Export Features, Formats & Tips for Your Formsite Results
Your Formsite form collects your form results in its Results Table where you can view, sort, and filter them. You are also able to export your results to a file you can save on your computer for a variety of reasons including:
- Regular backups for safe-keeping
- Order fulfillment
- Periodic reports
- Data source for external applications
- Copying your form (with results)
There are many formats and options available on the Results -> Export page to help you with these tasks.

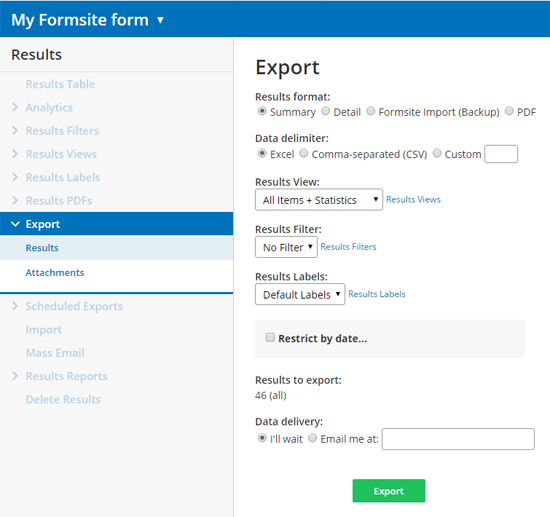
Your Results Table lets you see every individual result in a big table and getting that table as a file is done by going to Results -> Export and clicking the Export button.
Export Formats
- Summary:
The Summary format is the most common format and will export your table that looks virtually identical to the Results Table. The key to this format is that multi-select items are listed with the question as the column heading and the answer text as the result value. - Detail:
The Detail format is similar to the Summary but each multi-select item lists the available answers as column sub-headings with a number 1 as the result value. This is useful for tallying numbers of results with the various answers. - Backup:
The Backup format is used when you want to allow importing back into the form’s Results Table, as with a full data backup or to copy the results between copies of the form. This is common when copying forms to other accounts or consolidating forms within a single account.To use the Backup file to restore results or to add new results to your Results Table:- Start by exporting your results using the Backup format
- Next, edit the csv file taking care not to modify the column headings or order
- Save as a csv file
- Import using the page at Results -> Import.
- PDF:
The PDF format is unique in that it exports each result as its own file and combines every result within a zip archive. Combined with the custom PDF template features and this format can be an instant document generator.

Data Delimiter
The data delimiter refers to how you want your different fields separated. For example, a ‘csv’ file is short for Comma Separated Value file and will separate each value using a comma. The Excel option will format the exported file as an Excel-friendly format that opens without any dialog boxes.
You can choose to delimit your values with a custom character or string of characters if you need your export in a specific format (colons, semi-colons, hyphens, UTF-8 characters, etc.).
Views, Filters, & Labels
 Results Views:
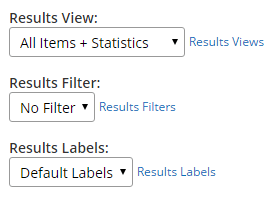
Customize which columns you export using Results Views. You can use the built-in All Items view to only see the answers to your form items, or the All Items + Statistics view to also see the date, user information, result reference number, etc.- Results Filters:
Receive a segment of your results table using Results Filters to apply conditional logic to your export. The Restrict by date function is a popular filter, but you can make your own to filter by any answer or combination of answers. - Results Labels:
Use Results Labels to export your results with custom column headings. For example, you may have a form item with the question, “Enter your email address” that you want to change to be simply, “email”.
Tips
- The Results to export area shows a count of how many results your current settings will export. If that number is high and/or your form has lots of items, you may want to consider the email data delivery option. That will perform your export and send you a message with a link to download instead of processing and downloading immediately.
- Attachments can be exported separately from the results by clicking the Attachments link in the left column. Export your attachments and delete them by going to Results -> Delete Results and selecting the Only attachment files option to free up file space in your account.